
Are you ready to dive into the delightful world of sourdough baking? Well, hold your horses! Before you can start whipping up those delicious loaves, you’ll need to master the art of creating a sourdough starter.
But hey, don’t fret! Figuring out how long it takes for your sourdough starter to be ready is all part of the adventure. In this guide, we’ll walk you through the process, step by step. From the initial feeding stage to monitoring its growth, we’ve got you covered.
And trust us, once you’ve got that bubbly, tangy goodness ready to go, you’ll feel like you truly belong among the elite sourdough bakers. So, let’s get started!
Key Takeaways
- The initial feeding stage of sourdough starter requires patience and understanding to allow for natural fermentation and the development of complex flavors, texture, and structure.
- Monitoring the growth of the starter through daily observation of activity, bubbles, and aroma is important to ensure proper development and readiness for baking.
- Factors such as temperature, hydration level, and type/quantity of flour can affect fermentation time, and adjustments can be made to speed up the starter’s development.
- Techniques for accelerating fermentation and troubleshooting slow growth include controlling temperature, adjusting hydration, stirring the starter, and incorporating ripe starter from a previous batch.
The Importance of Patience
If you want to make a successful sourdough starter, you need to have a lot of patience. Waiting is an essential part of the process, but it brings with it a multitude of benefits. Cultivating mindfulness and embracing the act of waiting can enhance your baking experience and promote a sense of belonging to the sourdough community.
The benefits of waiting for your sourdough starter to mature are numerous. Firstly, patience allows the natural fermentation process to take place, resulting in a more flavorful and aromatic bread. This waiting period also allows the wild yeasts and bacteria in the starter to develop and create a complex flavor profile. Secondly, waiting encourages the development of gluten in the dough, resulting in a better texture and structure of the bread. Lastly, waiting gives you the opportunity to observe and learn from the process, fostering a deeper understanding of the art of sourdough baking.
In addition to the benefits of waiting, cultivating mindfulness is an integral part of the sourdough journey. Patience teaches us to be present in the moment and appreciate the slow and deliberate pace of the fermentation process. It encourages us to be fully engaged with the ingredients, the dough, and the act of baking itself. By practicing mindfulness, we can find joy and fulfillment in the process, creating a sense of belonging to the sourdough community.
Understanding the Initial Feeding Stage
During the initial feeding stage, you’ll need to follow specific steps to activate your sourdough starter. This stage is crucial as it kickstarts the fermentation process and encourages the growth of beneficial microbes. The initial feeding process involves combining flour and water to create a mixture that attracts natural yeasts and bacteria present in the environment. These microorganisms will then begin to feed on the flour’s sugars and produce carbon dioxide and lactic acid, which are essential for the sourdough’s rise and flavor development.
To start the initial feeding process, you’ll need to mix equal parts of flour and water in a clean container. The exact measurements may vary depending on the recipe, but a common ratio is 1:1. Once combined, cover the mixture loosely to allow air circulation and place it in a warm spot, ideally around 75°F to 85°F (24°C to 29°C). This temperature range promotes optimal microbial activity.
Over the next few days, you’ll need to discard a portion of the mixture and feed it with fresh flour and water. This process helps maintain a healthy balance of microorganisms and prevents the buildup of waste products. As the initial feeding stage progresses, you’ll notice the sourdough becoming more active, with bubbles forming and a tangy aroma developing. This indicates that the microbial activity is increasing and your sourdough starter is on its way to being ready for baking.
Monitoring the Starter’s Growth
To monitor the starter’s growth, you’ll need to regularly observe its activity and track the development of bubbles and aroma. This will allow you to determine the progress of your sourdough starter and ensure that it’s developing properly.
As your starter begins to ferment, you’ll notice bubbles forming on the surface. These bubbles are a sign that the yeast and bacteria in the starter are active and producing carbon dioxide. By tracking the growth of these bubbles, you can monitor the progress of your starter.
Additionally, the aroma of your starter will change as it develops. Initially, it may have a slightly acidic smell, but as the fermentation process continues, it will develop a more complex and pleasant aroma. By paying attention to these changes in aroma, you can also track the growth of your starter.
Remember to monitor the progress of your starter daily, as changes can occur quickly. By carefully observing the activity, bubbles, and aroma, you’ll be able to ensure that your sourdough starter is on track for success.
Signs of Readiness for Baking
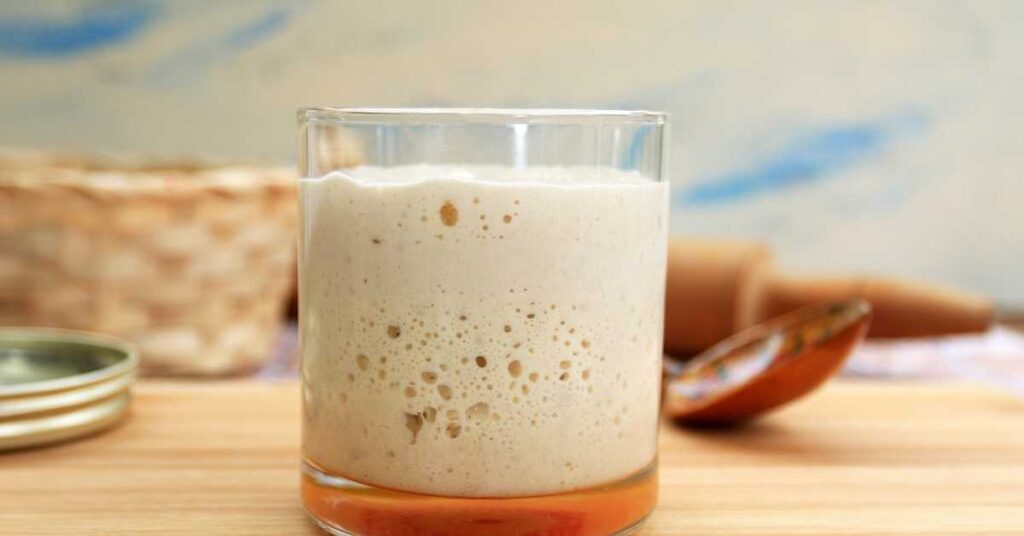
When your sourdough starter is ready for baking, you’ll notice several key signs of readiness. These signs indicate that your starter has reached its peak fermentation and is at its most active state, ready to leaven your bread. Here are five signs to look out for:
- Bubbles: Your starter should be full of bubbles throughout, indicating that fermentation is happening. The bubbles will be small and evenly distributed.
- Rise and Fall: A mature starter will rise and then fall back down after feeding. This shows that the yeast and bacteria are working together to produce carbon dioxide.
- Aroma: A ripe starter will have a pleasant, slightly sour aroma. This is a result of the lactic acid bacteria producing acids during fermentation.
- Texture: Your starter should have a creamy and elastic texture. It should be easy to stir and have a slightly sticky consistency.
- Float Test: To check if your starter is ready, drop a small spoonful of it into a cup of water. If it floats, it’s ready to be used for baking.
To achieve these signs of readiness, it’s important to follow proper proofing techniques and maintain the acidity of your starter. This can be done by regularly feeding and discarding a portion of your starter to control its pH level.
Factors Affecting Fermentation Time
Factors that can affect the fermentation time of your sourdough starter include temperature, hydration level, and the type and quantity of flour used.
Temperature plays a crucial role in the fermentation process. Higher temperatures can accelerate fermentation, resulting in a shorter fermentation time. Conversely, lower temperatures can slow down fermentation, leading to a longer fermentation time. It’s important to control the temperature of your sourdough starter to achieve the desired fermentation time.
Hydration level refers to the ratio of water to flour in your sourdough starter. A higher hydration level can expedite fermentation, while a lower hydration level can prolong it.
The type and quantity of flour used also influence fermentation time. Different flours have varying levels of enzymes and nutrients, which can impact the activity of the sourdough starter. Additionally, using a larger quantity of flour can create a more active fermentation, resulting in a shorter fermentation time.
To achieve a long fermentation time, you can opt for lower temperatures and adjust the hydration level and flour quantity accordingly. This slower fermentation process allows for more flavor development in the sourdough starter, resulting in a more complex and nuanced taste in your final baked goods. By controlling the temperature and adjusting the other factors, you can create the perfect environment for a long fermentation that enhances the flavor and texture of your sourdough bread.
Speeding up the Starter Development
If you want to accelerate the development of your sourdough starter, adjust the temperature, hydration level, and flour quantity accordingly. By making these adjustments, you can speed up the fermentation process and achieve quick starter development. Here are five ways to achieve this:
- Increase the temperature: A higher temperature will encourage the growth of yeast and bacteria, resulting in faster fermentation. Aim for a temperature range of 75-85°F (24-29°C).
- Increase hydration: A higher hydration level, meaning a higher water-to-flour ratio, will create a more favorable environment for fermentation. Use a wetter dough by adding more water to the starter.
- Use less flour: Using a smaller amount of flour will speed up fermentation by providing less food for the yeast and bacteria. Reduce the flour quantity in your starter recipe.
- Stir frequently: Stirring the starter more often will introduce more oxygen, which helps promote the growth of yeast and bacteria.
- Use ripe starter: Incorporating a small amount of mature, active starter from a previous batch can help jumpstart the fermentation process.
By implementing these strategies, you can accelerate the development of your sourdough starter and achieve the desired results in a shorter period of time.
Remember to monitor the progress of your starter regularly and adjust the variables as needed to achieve optimal fermentation.
Troubleshooting Slow Starter Growth
To troubleshoot slow starter growth, you can try adjusting the temperature, hydration level, and flour quantity as mentioned in the previous section. These troubleshooting techniques can help you identify and rectify common mistakes that may be hindering the growth of your sourdough starter.
One common mistake is keeping the starter in an environment that’s too cold. Yeast and bacteria thrive in warm temperatures, so try to maintain an ambient temperature of around 75°F (24°C) for optimal growth. If your kitchen is too cold, you can place the starter in a slightly warmer area of your home, like on top of the refrigerator.
Another mistake could be having a low hydration level. Increasing the hydration, or the amount of water in the starter, can help provide a more favorable environment for yeast and bacteria to grow. You can try adding more water to your starter, gradually increasing the hydration until you see improved growth.
Finally, you may not be feeding your starter with enough flour. Yeast and bacteria need a steady supply of food to grow and reproduce. Make sure you’re feeding your starter regularly, at least once every 24 hours, and using enough flour to provide adequate nourishment.
Storing and Maintaining the Sourdough Starter
When storing and maintaining your sourdough starter, ensuring proper temperature, hydration, and feeding schedule is essential. To keep your sourdough starter healthy and active, consider the following tips:
- Storage: Store your sourdough starter in a glass or food-safe plastic container with a loose-fitting lid. Avoid using metal containers as they can react with the acidic nature of the starter. Keep it in the refrigerator when not in use to slow down fermentation and extend its lifespan.
- Hydration: Maintain the hydration level of your sourdough starter by regularly feeding it with equal parts of flour and water. This helps to keep the consistency and activity of the starter balanced.
- Feeding Schedule: Establish a feeding schedule for your sourdough starter. Depending on the temperature and activity level, you may need to feed it daily or every few days. Consistency is key to maintaining a healthy and active starter.
- Temperature Control: Keep your sourdough starter in a warm environment, ideally between 70-85°F (21-29°C). Avoid exposing it to extreme temperatures, as this can affect its activity.
- Observation: Regularly observe your sourdough starter for any signs of mold, off smells, or unusual discoloration. If any of these occur, discard the starter and start fresh.
Frequently Asked Questions
Can I Use a Different Type of Flour to Feed My Sourdough Starter?
You can definitely use a different type of flour to feed your sourdough starter. Experimenting with alternative flours can add unique flavors and textures to your bread. Just make sure to adjust the hydration and feeding ratios accordingly.
Is It Normal for My Sourdough Starter to Have a Strong Smell?
It’s normal for your sourdough starter to have a strong smell during the fermentation process. However, if the smell is unpleasant or foul, it could indicate a problem. Troubleshooting can help identify and fix any issues.
How Often Should I Discard and Feed My Sourdough Starter?
To maintain a healthy sourdough starter, you should discard and feed it regularly. This helps regulate the fermentation process and prevents common issues like excessive acidity or mold growth. It’s essential for troubleshooting and maintaining a thriving starter.
Can I Use Tap Water to Feed My Sourdough Starter?
Using tap water to feed your sourdough starter is fine, but filtered water can help remove chlorine and other impurities. Additionally, using organic flour for your starter can provide added benefits.
How Long Can I Store My Sourdough Starter in the Refrigerator Before Using It?
To store your sourdough starter in the refrigerator, transfer it to a clean, airtight container. When you’re ready to use it again, revive the dormant starter by feeding it regularly until it becomes active and bubbly.
Conclusion
In conclusion, the time it takes for a sourdough starter to develop can vary depending on various factors such as temperature, ingredients, and feeding schedule.
Patience is key when it comes to sourdough baking, as the initial feeding stage and monitoring the starter’s growth are crucial steps.
However, if you’re looking to speed up the process, there are techniques you can try.
Remember to troubleshoot any issues that may arise and properly store and maintain your sourdough starter for continued success.