
Are you ready to take your sourdough bread to the next level? Did you know that adjusting the hydration levels in your recipe can significantly impact the texture and flavor of your bread? It’s true!
In fact, many expert bakers believe that hydration is one of the most crucial factors in achieving that perfect, artisanal loaf. By making small changes to the amount of water you add to your dough, you can create a bread that is light and airy or dense and chewy, depending on your preference.
But how do you go about adjusting hydration levels? Don’t worry, we’ve got you covered. In this guide, we’ll walk you through the process step by step, giving you all the tips and tricks you need to create your own signature sourdough masterpiece.
Key Takeaways
- Hydration levels in sourdough bread recipes affect texture, flavor, fermentation process, gluten development, and overall structure of the bread.
- The optimal hydration range for sourdough bread recipes is typically between 65% and 75%.
- Factors such as the type of flour used, temperature, humidity, and desired texture should be considered when adjusting hydration levels.
- Techniques for increasing hydration include gradually adding more water while mixing and incorporating additional ingredients like milk or fruit purees. Techniques for decreasing hydration involve using less water while mixing and adjusting the dough texture with small amounts of water or flour.
Understanding the Role of Hydration in Sourdough Baking
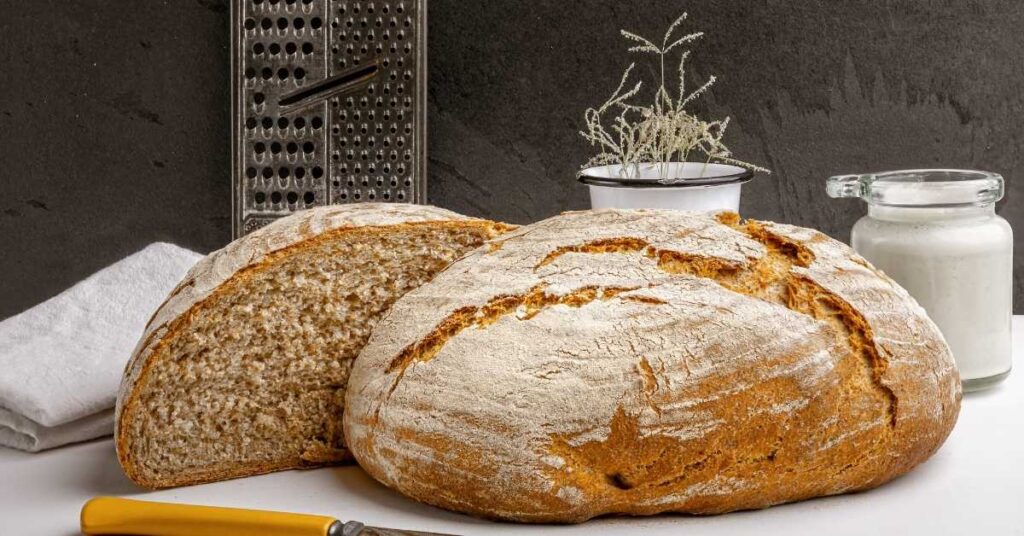
To achieve optimal results in your sourdough baking, understanding the role of hydration is essential. Hydration refers to the amount of water in relation to the amount of flour in your sourdough bread recipe. It plays a crucial role in the texture and flavor of your final product.
Understanding the science behind hydration levels in sourdough baking is key to achieving the desired outcome. The hydration level affects the fermentation process, gluten development, and overall structure of the bread. Higher hydration levels result in a more open crumb and chewier texture, while lower hydration levels produce a denser crumb and a more compact loaf.
The impact of hydration on the texture and flavor of sourdough bread is significant. A higher hydration dough will have a lighter, airier texture with larger air pockets, giving it a more rustic and artisanal feel. It also contributes to a more pronounced sour flavor due to increased fermentation. On the other hand, a lower hydration dough will yield a denser, more compact texture with smaller air pockets, resulting in a milder flavor profile.
Determining the Optimal Hydration Range for Your Recipe
To determine the optimal hydration range for your sourdough bread recipe, you need to consider the desired texture and flavor of your final product. The hydration level of your dough plays a crucial role in the overall quality of your bread, as it affects its crumb structure, crust development, and taste. Measuring hydration levels accurately is essential for achieving consistent results.
To measure hydration levels, you can use a simple formula: divide the weight of water in your recipe by the weight of flour, and multiply the result by 100. This will give you the hydration percentage. For example, if your recipe has 400 grams of water and 600 grams of flour, the hydration level would be 66.67%.
The optimal hydration range for sourdough bread recipes typically falls between 65% and 75%. A lower hydration level, closer to 65%, will result in a tighter crumb and a denser texture. On the other hand, a higher hydration level, closer to 75%, will produce a more open crumb and a lighter texture.
Experimenting with different hydration levels will allow you to fine-tune your recipe to achieve the desired outcome. It’s important to note that the optimal hydration range may vary depending on factors such as the type of flour used, the ambient temperature, and the desired style of bread. Keeping detailed records of your experiments will help you determine the optimal hydration range for your specific recipe and baking conditions.
Factors to Consider When Adjusting Hydration Levels
Consider the consistency of your dough when adjusting hydration levels in your sourdough bread recipe. There are several factors to consider when making adjustments, as the hydration level has a significant effect on the texture of your dough.
One factor to consider is the type of flour you’re using. Different types of flour absorb water differently, so it’s important to adjust the hydration level accordingly. For example, whole wheat flour tends to absorb more water than all-purpose flour, so you may need to increase the hydration level when using whole wheat flour in your recipe.
Another factor to consider is the temperature and humidity in your kitchen. These factors can affect how much water your flour absorbs. In warmer and more humid environments, your flour may absorb more water, so you may need to decrease the hydration level slightly. On the other hand, in cooler and drier environments, your flour may absorb less water, so you may need to increase the hydration level.
Additionally, the desired texture of your final bread should be taken into account. A higher hydration level will result in a more open and airy crumb, while a lower hydration level will result in a denser crumb. Consider the type of bread you want to achieve and adjust the hydration level accordingly.
Increasing Hydration: Techniques and Tips
To increase the hydration of your sourdough bread dough, add more water gradually while mixing until you achieve the desired consistency. Increasing the hydration level of your dough can have several benefits, but it also comes with a few drawbacks.
The main benefit of higher hydration is that it produces a lighter and airier bread with larger holes and a more open crumb structure. The dough is also easier to handle and shape, as it becomes more pliable and less sticky. Additionally, higher hydration levels can enhance the flavor and aroma of your sourdough bread.
However, there are a few drawbacks to consider when increasing the hydration of your dough. Firstly, a higher hydration level may result in a slightly longer proofing time, as the extra water can slow down the fermentation process. This means that you might need to adjust your baking schedule accordingly. Secondly, a more hydrated dough can be more challenging to handle, especially for beginners. It can be sticky and difficult to shape, requiring some practice and technique to achieve the desired results.
If you want to incorporate additional ingredients to increase the hydration level even further, you can consider using ingredients like milk, yogurt, or even fruit purees. These ingredients not only add moisture but also contribute to the flavor profile of your sourdough bread. Just keep in mind that adding these ingredients will also affect the overall dough consistency and fermentation process, so it’s important to experiment and adjust accordingly.
Decreasing Hydration: Techniques and Tips
If you want to decrease the hydration of your sourdough bread dough, you can use less water while mixing, resulting in a denser and firmer texture. Decreasing the water content is the key to achieving lower hydration levels and modifying the dough consistency. By reducing the amount of water, you’ll be able to control the dough’s moisture and create a dough that’s less sticky and more manageable.
One technique to decrease hydration is to gradually add water while mixing until you reach the desired consistency. This allows you to have better control over the dough’s hydration level.
Another method is to use a lower hydration starter. By feeding your sourdough starter with less water, it will have a lower hydration level, which will subsequently lower the overall hydration of your dough.
When decreasing the water content, it’s essential to monitor the dough’s texture and adjust as needed. If the dough feels too dry and stiff, you can add small amounts of water gradually until it reaches the desired consistency. On the other hand, if the dough is too wet and sticky, you can add a bit more flour to achieve a firmer texture.
Remember that adjusting hydration levels is a matter of personal preference and the type of bread you’re making. Experimenting with different water amounts will help you find the perfect consistency that suits your taste and desired outcome.
Achieving the Perfect Balance: Finding Your Ideal Hydration Level
Wondering how to find the ideal hydration level for your sourdough bread recipe? Finding the right consistency is key to achieving the perfect balance in your bread. The hydration level, or the amount of water in relation to the amount of flour, has a significant impact on the texture of your final product. Here are four tips to help you find your ideal hydration level:
- Start with a basic recipe: Begin with a recipe that provides a suggested hydration level. This will serve as a good starting point for your experiments.
- Gradually adjust the hydration: Make small adjustments to the amount of water in your recipe, either by adding more or less, until you achieve the desired consistency. Keep track of the changes you make for future reference.
- Consider the flour type: Different flours have different absorption rates, meaning they’ll require varying amounts of water. Take into account the type of flour you’re using and adjust the hydration level accordingly.
- Trust your instincts: The right consistency is subjective and may vary depending on personal preferences. Trust your senses and adjust the hydration level until the dough feels right to you.
Experimenting With Different Flour Types and Hydration Ratios
Now that you have found your ideal hydration level, it’s time to experiment with different flour types and hydration ratios to further enhance your sourdough bread recipe. By experimenting with alternative grains, you can introduce new flavors and textures to your bread while maintaining its signature sourdough taste. Different grains, such as rye, spelt, or whole wheat, can be used in combination with your regular flour to create a unique blend that suits your preferences.
When experimenting with different flour types, it’s important to consider the hydration levels in different bread recipes. Hydration refers to the amount of water in relation to the amount of flour used. By comparing hydration levels in various bread recipes, you can determine how much water is needed for each type of flour. This will help you achieve the desired consistency and texture in your sourdough bread.
To start experimenting, you can gradually increase or decrease the hydration level in your recipe and observe the effects on the final product. Keep in mind that higher hydration levels result in a more open crumb structure and a chewier texture, while lower hydration levels produce a denser crumb. It may take a few tries to find the perfect balance, but the process of experimentation will allow you to discover new possibilities and create a sourdough bread recipe that’s uniquely yours.
Remember to document your findings and make notes on the flour types and hydration ratios you have tried. This will help you keep track of your experiments and enable you to replicate successful results in the future. Enjoy the journey of exploring new flavors and textures with different flour types and hydration ratios in your sourdough bread recipe.
Troubleshooting Common Issues With Hydration Adjustments
To troubleshoot common issues with hydration adjustments, identify any problems with your sourdough bread’s texture or consistency. Troubleshooting dough consistency is crucial for achieving the desired outcome in your baking process.
Here are four key points to consider when troubleshooting dough consistency and understanding yeast fermentation:
- Too Dry Dough: If your dough feels stiff and dry, it may indicate insufficient hydration. Try increasing the amount of water in your recipe gradually until the dough becomes more pliable and easier to work with.
- Too Wet Dough: On the other hand, if your dough is overly sticky and wet, it may indicate excessive hydration. In this case, you can try reducing the amount of water in your recipe or adding a bit more flour to achieve the desired consistency.
- Inadequate Fermentation: If your dough fails to rise properly or lacks the desired flavor, it could be due to inadequate yeast fermentation. Ensure that your dough is fermenting in a warm environment and give it enough time to rise. Adjusting the temperature and fermentation time can help improve the final result.
- Overfermented Dough: Overfermentation can lead to a dense and gummy texture in your bread. To prevent this, be mindful of the fermentation time and temperature. Additionally, consider reducing the amount of yeast or sourdough starter in your recipe to slow down the fermentation process.
Tracking and Documenting Your Hydration Adjustments
To accurately track and document your hydration adjustments, keep a detailed record of the amount of water and flour you add or deduct from your sourdough bread recipe. This record will help you track your progress and measure the results of your adjustments.
Start by noting down the original recipe’s hydration level, which is the ratio of water to flour expressed as a percentage. For example, if your recipe calls for 500 grams of flour and 300 grams of water, the hydration level would be 60%.
When making adjustments, carefully calculate the changes you make. If you’re increasing hydration, note down the additional amount of water you add. Similarly, if you’re reducing hydration, record the amount of water you deduct. For instance, adding 50 grams of water to the original recipe would increase the hydration level to 70%.
To measure the results of your adjustments, pay attention to the texture of the dough during the mixing and kneading process. A higher hydration level will result in a stickier and more extensible dough, while a lower hydration level will yield a drier and stiffer dough. Additionally, observe the final texture and crumb structure of the baked bread.
Expert Insights: Tips From Professional Bakers on Hydration Adjustments
Gaining insights from professional bakers, you can enhance your hydration adjustments in your sourdough bread recipe. These experts have shared valuable tips that can help you achieve the perfect hydration levels in your dough. Here are four key insights to consider:
- Importance of temperature in sourdough hydration:
Temperature plays a crucial role in the hydration process. Understanding the optimal temperature range for your sourdough starter and dough is essential for achieving the desired results. Higher temperatures can lead to faster fermentation and a more liquid-like dough, while lower temperatures can slow down the fermentation and result in a stiffer dough. - Effects of hydration on the fermentation process:
Hydration levels directly impact the fermentation process. Higher hydration doughs tend to ferment faster due to increased yeast activity and enzyme action, resulting in a more open crumb structure. On the other hand, lower hydration doughs ferment more slowly, allowing for more flavor development and a denser crumb. - Adjusting hydration based on flour type:
Different flours have varying water absorption capacities. It’s important to consider the type of flour you’re using and adjust the hydration levels accordingly. Whole grain flours generally require more water, while refined flours may need less. Experimentation and observation will help you find the right hydration ratio for each type of flour. - Gradual adjustments for better control:
When making hydration adjustments, it’s advisable to do so gradually. Small increments, such as adding or reducing water by 5%, allow for better control over the dough consistency. This approach enables you to fine-tune your recipe and achieve the desired texture and flavor in your sourdough bread.
Frequently Asked Questions
Can I Use Tap Water for Hydration Adjustments in My Sourdough Bread Recipe?
You can adjust hydration in your sourdough bread recipe by using tap water. However, consider the safety of tap water and the benefits of using filtered water to ensure the best quality and taste.
How Long Does It Take for the Hydration Adjustments to Take Effect in the Dough?
To understand how long it takes for hydration adjustments to affect your dough, it’s essential to troubleshoot hydration issues in sourdough bread recipes. The final texture of your sourdough bread heavily relies on hydration levels.
Can I Adjust the Hydration Levels in My Sourdough Bread Recipe After the Dough Has Been Shaped?
Yes, you can adjust the hydration levels in your sourdough bread recipe after shaping. This will affect the texture of the bread, making it more or less dense, without affecting the flavor.
Are There Any Alternative Ingredients I Can Use to Adjust Hydration Levels in My Sourdough Bread Recipe?
To adjust hydration levels in your sourdough bread recipe, consider using alternative ingredients. This can provide benefits such as improved texture and flavor. Experiment with options like different types of flour or adding ingredients like milk or yogurt.
What Is the Recommended Hydration Level for Sourdough Bread Recipes Using Whole Wheat Flour?
The recommended hydration level for sourdough bread recipes using whole wheat flour is typically around 75-80%. This level of hydration helps to enhance the flavor, improve the texture, and increase the nutritional value of the bread.
Conclusion
In conclusion, adjusting hydration levels in your sourdough bread recipe is a crucial step in achieving the desired texture and flavor. By understanding the role of hydration, determining the optimal range for your recipe, and considering various factors, you can make effective adjustments.
Techniques such as increasing or decreasing hydration, experimenting with flour types, and troubleshooting common issues will help you achieve the perfect balance.
Tracking and documenting your adjustments will enable you to refine your recipe over time.
Follow expert insights from professional bakers to enhance your sourdough baking skills.