
Are you wondering how long it takes to proof your sourdough at room temperature? Well, look no further! In this guide, we will explore the factors that affect the proofing time of your sourdough, so you can achieve that perfect loaf you’ve been dreaming of.
From understanding the temperature of your room to determining the hydration of your dough, we’ll cover it all. Whether you prefer a basic sourdough with a recommended proofing time or want to experiment with longer or shorter proofing times for enhanced flavor or a lighter texture, we’ve got you covered.
So, let’s dive in and master the art of proofing sourdough at room temperature together!
Key Takeaways
- Ambient temperature is a key factor in proofing time for sourdough.
- Consistency in room temperature is crucial for even fermentation.
- Dough hydration affects the texture and structure of the bread.
- Adjusting proofing time and temperature can alter the flavor profile of sourdough.
Factors Affecting Proofing Time
To understand the factors affecting proofing time, you need to be aware of the conditions your sourdough is exposed to. There are several key factors to consider when optimizing the proofing process.
Firstly, the ambient temperature plays a crucial role in determining the proofing time. Yeast activity is influenced by temperature, and warmer temperatures accelerate fermentation, resulting in a shorter proofing time. Conversely, cooler temperatures slow down fermentation, extending the proofing time. It’s important to find the ideal temperature range for your sourdough to achieve optimal results.
Another factor to consider is the hydration level of the dough. Higher hydration levels tend to promote faster fermentation and proofing, while lower hydration levels slow down the process. Experimenting with different hydration levels can help you find the perfect balance for your desired texture and flavor.
Additionally, the type and quantity of yeast or starter used can significantly impact proofing time. Active and healthy starters containing a higher concentration of yeast will ferment more quickly. It’s essential to maintain a consistent and vigorous starter to ensure reliable proofing times.
Lastly, factors such as dough handling techniques, kneading, and shaping methods can affect proofing time. Proper handling and shaping techniques help to create an optimal environment for fermentation, resulting in more consistent and predictable proofing times.
Understanding Room Temperature
To understand room temperature and its impact on proofing your sourdough bread, you should consider its role as the baseline for fermentation. Room temperature plays a crucial role in determining the time it takes for your sourdough to proof properly. Here are a few key points to help you understand the importance of room temperature:
- Measuring temperature accurately: It’s essential to have an accurate thermometer to measure the room temperature. Even a slight variation can greatly affect the fermentation process and the final outcome of your bread.
- Consistency is key: Maintaining a consistent room temperature throughout the proofing process is crucial. Fluctuations in temperature can lead to uneven fermentation and inconsistent results.
- Optimal temperature range: The ideal room temperature for proofing sourdough is between 70-75°F (21-24°C). This temperature range provides the optimal conditions for the yeast to grow and the dough to rise.
- Slow and steady: A cooler room temperature will result in a slower fermentation process, while a warmer room temperature will speed it up. It’s important to find the right balance to allow the dough to develop its flavors fully.
Understanding the impact of room temperature on the proofing process is essential for achieving the perfect loaf of sourdough bread. By measuring the temperature accurately and maintaining a consistent environment, you can ensure that your bread rises to its full potential.
Determining Dough Hydration
Understanding the impact of room temperature on the proofing process, you can now determine the hydration of your dough. Dough hydration refers to the amount of water used in relation to the amount of flour in your recipe. It’s a crucial factor in achieving the desired dough consistency and ultimately affects the texture and structure of your bread.
To measure the hydration of your dough, you need to calculate the ratio of water to flour. This can be done by weighing the ingredients using a kitchen scale. Start by weighing the amount of flour and water separately. Then, divide the weight of the water by the weight of the flour and multiply the result by 100 to get the percentage of hydration.
For example, if your recipe calls for 500 grams of flour and 350 grams of water, the hydration would be calculated as follows:
(350 grams of water / 500 grams of flour) x 100 = 70% hydration
The dough consistency can vary depending on the hydration level. Higher hydration doughs are more hydrated and tend to be stickier and more difficult to handle. Lower hydration doughs are drier and easier to shape. By measuring the hydration of your dough, you can adjust the recipe or technique to achieve the desired consistency and improve your baking results.
Adjusting Proofing Time for Desired Flavor
To adjust the proofing time for your desired flavor, consider the fermentation duration of your sourdough at room temperature. The proofing time plays a crucial role in developing the distinct taste and texture of your sourdough bread. By adjusting the proofing time, you can experiment with the fermentation process to achieve the flavor profile that suits your preferences.
Here are some key points to keep in mind when adjusting the proofing time:
- Adjusting proofing temperature: The temperature at which you proof your sourdough can significantly impact the fermentation process. Higher temperatures accelerate fermentation, resulting in a more pronounced sour flavor. On the other hand, lower temperatures slow down fermentation, producing a milder and more nuanced taste.
- Experimenting with fermentation: Understanding the fermentation process of your sourdough is essential for adjusting the proofing time. By experimenting with different durations, you can observe how the flavor evolves over time. Start with shorter proofing times for a milder flavor, and gradually increase the duration to intensify the sourness.
- Monitoring dough activity: Keep a close eye on your dough during proofing to determine its readiness. Look for signs of increased volume, a domed shape, and a slightly wobbly texture. These indicators suggest that the fermentation is progressing well, and the dough is nearing its optimal flavor development.
- Personal taste preferences: Ultimately, the proofing time should align with your personal taste preferences. Some individuals enjoy a tangier and more robust flavor, while others prefer a more subtle sourness. Experimentation and adjusting the proofing time will help you find the perfect balance that satisfies your unique palate.
Recommended Proofing Time for Basic Sourdough
For a basic sourdough, the recommended proofing time at room temperature is typically between 4 to 6 hours. However, it’s important to note that proofing time can vary depending on several factors. One of the main factors that can affect proofing time is the temperature of the room. The ideal room temperature for proofing sourdough is around 70 to 75 degrees Fahrenheit (21 to 24 degrees Celsius). At this temperature range, the yeast activity is optimal, allowing the dough to rise at a consistent and controlled rate.
Proofing time variations can occur if the room temperature is higher or lower than the ideal range. If the room is warmer than 75 degrees Fahrenheit (24 degrees Celsius), the dough may proof faster, and the recommended proofing time can be reduced to around 3 to 4 hours. On the other hand, if the room is cooler than 70 degrees Fahrenheit (21 degrees Celsius), the dough may take longer to proof, and the recommended proofing time can be extended to around 6 to 8 hours.
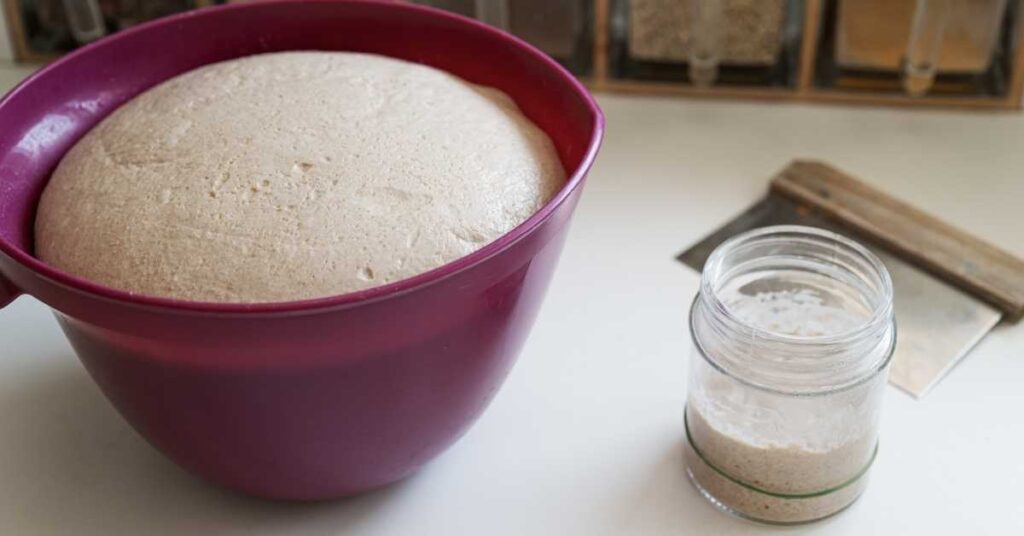
It is important to monitor the dough during the proofing process to determine the optimal proofing time. The dough should increase in volume by about 30% to 50% and should pass the ‘poke test.’ This test involves gently poking the dough with a finger, and if the indentation slowly springs back, it’s ready for baking.
Remember that these recommended proofing times are guidelines, and it may require some experimentation to find the perfect proofing time for your specific sourdough recipe and room conditions.
Longer Proofing Time for Enhanced Flavor
To achieve a more pronounced and complex flavor profile, consider extending the proofing time of your sourdough at room temperature. By allowing the dough to ferment for a longer period, you can enhance the fermentation process and promote the development of a richer flavor.
Here are some key points to keep in mind when aiming for enhanced flavor development:
- Increased fermentation time: Letting the dough proof for a longer duration allows the wild yeast and bacteria to further break down the starches and proteins in the flour, resulting in the release of more flavor compounds.
- Deeper flavor complexity: The extended fermentation time allows for the development of more intricate flavors, as the byproducts of fermentation intensify and meld together over time.
- Enhanced sourness: If you enjoy a tangier sourdough, lengthening the proofing time can help intensify the acidity in the final loaf, giving it a more pronounced sour taste.
- Improved aroma: The extended proofing time allows the dough to develop a more enticing aroma, as the fermentation process produces aromatic compounds that contribute to the overall flavor experience.
Shorter Proofing Time for Lighter Texture
If you want a lighter texture in your sourdough bread, shorten the proofing time. By reducing the fermentation period, you can achieve a more open and airy crumb structure. The proofing time is crucial in determining the final texture of your bread.
During proofing, the yeast in the sourdough starter consumes the carbohydrates in the flour, producing carbon dioxide gas. This gas gets trapped in the gluten network, causing the dough to rise. With a shorter proofing time, the fermentation process is accelerated, leading to a more efficient production of carbon dioxide. This rapid gas production creates larger air pockets, giving the bread a lighter texture.
To achieve a lighter texture, it’s important to monitor the dough closely during the proofing stage. You can perform a simple test to check if the dough is ready by pressing your finger lightly into the surface. If the indentation slowly fills back in, the dough needs more time to proof. However, if the indentation springs back quickly, it indicates that the dough is properly proofed and ready for baking.
Troubleshooting Over-Proofed Dough
To avoid over-proofed dough, monitor it closely throughout the proofing process, regularly checking for signs of readiness. Over-proofed dough can result in a dense, flat, and tasteless final product. It’s important to catch any signs of over-proofing early on to salvage the dough and achieve a desirable texture and flavor.
Signs of over-proofed dough include:
- Excessive rise: The dough may rise too much and become puffy, losing its structure and developing large air pockets.
- Lack of elasticity: Over-proofed dough tends to lose its elasticity and become sticky and difficult to handle.
- Sour or alcoholic smell: If the dough has a strong, unpleasant smell, it may have fermented for too long.
- Sluggish or no rise: If the dough doesn’t rise at all or rises very slowly during the proofing process, it may be over-proofed.
If you realize that your dough is over-proofed, there are a few steps you can take to salvage it:
- Punch down the dough: Gently deflate the dough by pressing it down with your hands to release excess gas.
- Reshape and reproof: Shape the dough into the desired form and allow it to proof for a shorter time than originally recommended.
- Bake immediately: If the dough is too far gone to be salvaged through reproofing, bake it right away to prevent further fermentation.
Final Proofing Tips and Tricks
Keep an eye on your dough during the proofing process, so you can apply these final proofing tips and tricks for optimal results. Final proofing is the last stage before baking, where the dough undergoes its final rise. To achieve an optimal rise and a perfectly textured sourdough, here are some techniques to consider.
Firstly, ensure that your dough is proofed at the right temperature. Sourdough thrives in a warm environment between 75-80°F (24-27°C). Maintaining a consistent temperature throughout the final proofing process is crucial for achieving a well-risen loaf. You can use a proofing box or place your dough near a warm spot in your kitchen.
Secondly, pay attention to the duration of the final proof. The time required for proofing can vary depending on factors such as the ambient temperature and the hydration level of your dough. As a general guideline, aim for a final proof of 2-4 hours. However, the best way to determine if your dough is ready is by performing the ‘poke test.’ Gently press your finger into the dough, and if it springs back slowly, it’s ready to bake.
Lastly, consider shaping your dough properly before the final proof. A well-shaped loaf will help ensure an even rise and structure. Take the time to gently stretch and fold your dough into a tight, cohesive shape, removing any excess air bubbles.
Frequently Asked Questions
Can I Proof My Sourdough in the Refrigerator Instead of at Room Temperature?
You can proof your sourdough in the refrigerator instead of at room temperature. However, keep in mind that room temperature proofing offers benefits like enhanced flavor development and a more active fermentation process.
How Does Altitude Affect Proofing Time for Sourdough?
To adjust proofing time for sourdough at high altitude, factors that can affect the proofing time include atmospheric pressure, temperature, and humidity. It is essential to monitor these variables closely for optimal results.
What Is the Ideal Room Temperature for Proofing Sourdough?
To maintain the ideal room temperature for proofing sourdough, aim for a range of 70-75°F. Keep the dough in a draft-free area, away from direct sunlight or cold drafts. Use a thermometer to monitor and adjust if needed.
Can I Use a Bread Proofer to Speed up the Proofing Process?
To speed up the proofing process, you can use a bread proofer. It offers benefits like consistent temperature control and shorter proofing times. Alternatively, you can try other proofing methods like using a warm oven or a proofing box.
How Does the Type of Flour Used Affect the Proofing Time of Sourdough?
When using different types of flour, such as whole wheat, the proofing time of sourdough can be affected. The hydration level plays a role in the fermentation process, impacting the time it takes for the dough to rise at room temperature.
Conclusion
In conclusion, the proofing time for sourdough at room temperature can vary depending on several factors such as dough hydration, desired flavor, and texture. It’s important to understand these factors and adjust proofing time accordingly to achieve the desired results.
Longer proofing time can enhance flavor, while shorter proofing time can result in a lighter texture. It’s also crucial to avoid over-proofing the dough and to follow recommended proofing tips and tricks for successful sourdough baking.